Different approach to Attributed Strings in Swift
Apr 30, 2020 19:01 · 6 minute read
Both StringInterpolation and NSAttributedString were extensively explored back when StringInterpolation was released in Swift 5.0. I liked the idea, but something really put me off when I started actually implementing my screens:
let gameRules: AttributedString = """
  \("Monopoly", .color(.blue), .fontWeight(.bold))
  \("1.", .fontWeight(.bold)) Each player rolls the dice to see who goes first.
  ...
  Learn more \("here", .url("https://simple.wikipedia.org/wiki/Monopoly_(game)"), .color(.blue), .underline(.red, .single))
"""
It is just the beginning and I already felt that this is gonna get pretty bloated pretty fast. And so, even though I really, really liked the idea of StringInterpolation, I didn’t have a clue how to use it efficiently and improve my codebase while doing so.
Last week, though, I’ve been playing with different ideas for the StringInterpolation implementation and finally tried to poke around the AttributedString again. Eventually, I started playing with more declarative, abstracted declaration of an AttributedString:
let gameRules: AttributedString = """
    \("Monopoly", .important(.very))
    \("1.", .important()) Each player rolls the dice to see who goes first.
    ...
    Learn more \("here", .tappable(openWikipedia))
"""
This really felt good to write, not only because I didn’t have to type all these styles again and again, but also because I separated the what from how - and this was huge for me.
See, NSAttributedString is really interesting when you’re using architecture that tries to separate the UI from the business logic. You can set both text/images, which are usually translated or based on some conditional statements related to business logic, but also you can style these with font, textColor etc. which should really be a responsibility of a view layer to know how to render your data. Most of the time people just weight pros/cons of writing something that would help with that “tiny detail” of their architecture responsibilities and just go ahead and style the view in business-logic-controllers or, the other way around, move texts-logic to the views. Is it bad? As always, it depends, but at the end of the day what matters is that you ship the product rather than spend a week on an abstraction just because you didn’t follow the pattern fully.
This layer, though, is something really small and tailored for specific needs. Because I don’t need more (even though I use the AttriutedString pretty extensively), I only declared two attributes (important and tappable) and two parts (text, image). Now, I can safely say to my view what parts of the texts should be texts/images, what should be tappable and what is really important to me. Then, view layer will create styles based on the instructions I passed.
So how does the AttributedString implementation look like?
struct AttributedString: ExpressibleByStringInterpolation {
    enum Attribute: Hashable {
        enum ImportanceLevel: String, Equatable {
            case very
            case enough
        }
        case important(ImportanceLevel = .enough)
        case tappable(id: String = UUID().uuidString, (() -> Void)?)
    }

    enum Part {
        case text(String, attributes: Set<Attribute> = Set())
        case image(UIImage)
    }

    var children = [Part]()
    var attributes = Set<Attribute>()

    ...
}
This is just what worked for my projects. If you have even simpler views, you can probably remove the ImportanceLevel. If you have even more needs, then you could add support for attributes to images or extend the ImportanceLevel. The idea is that the type is really designed to fit the need of a product so to try and make it generic to produce a library was a little bit to much for me (though, if you would need different attributes for different types, you could also extract Attributes and make the AttributedString<Attributes> generic type).
Also one thing to notice is how I collect the attributes. I really wanted to use enums with associated type and didn’t want the attributes to duplicate. And so I use Set (which enforces the Hashable implementation) and also think beforehand if the attribute makes sense with all the other attributes.
Oh, and also, I hid all the boilerplate of implementing the ExpressibleByStringInterpolation since there’s not much going on (if you want full source though, scroll down!). The difference between my implementation and the ones I saw on the web is that I don’t actually use NSAttributedString as an underlying storage, but I just collect parts of the string and let the View decide how it wants to render these parts on the screen. As an example, here’s an excerpt from my AttributedTextView implementation:
final class AttributedTextView: UITextView, UITextViewDelegate {
    var attributesResolver: ((Set<AttributedString.Attribute>) -> [NSAttributedString.Key: Any])?
    var defaultAttributes = [NSAttributedString.Key: Any]()

    private var links = [String: () -> Void]()

    ...

    func set(attributedString: AttributedString) {
        if let defaultFont = defaultAttributes[.font] as? UIFont {
            font = defaultFont
        }
        if let defaultTextColor = defaultAttributes[.foregroundColor] as? UIColor {
            textColor = defaultTextColor
        }

        let nsAttributedString = attributedString.children
            .map { part in
                switch part {
                case let .image(image):
                    return NSAttributedString(attachment: centeredTextAttachment(image: image, font: font))
                case let .text(string, attributes: attributes):
                    return NSAttributedString(string: string, attributes: nsAttributes(from: attributes))
                }
            }
            .reduce(NSAttributedString(), +)
            .mutableCopy() as! NSMutableAttributedString

        if let paragraphStyle = defaultAttributes[.paragraphStyle] as? NSParagraphStyle {
            let range = NSRange(location: 0, length: nsAttributedString.length)
            nsAttributedString.addAttribute(.paragraphStyle, value: paragraphStyle, range: range)
        }
        attributedText = nsAttributedString
        fitHeightToText()
    }

    ...

    private func nsAttributes(from attributes: Set<AttributedString.Attribute>) -> [NSAttributedString.Key: Any] {
        var nsAttributes = attributesResolver?(attributes) ?? [:]

        if let tapAction = tapAction(from: attributes) {
            let id = UUID().uuidString
            links[id] = tapAction
            nsAttributes[.link] = URL(string: id)
        }

        if nsAttributes[.font] == nil {
            nsAttributes[.font] = font
        }

        if nsAttributes[.foregroundColor] == nil {
            nsAttributes[.foregroundColor] = textColor
        }

        return nsAttributes
    }
}
I hid some parts for customizing UI in UITextView, but essentially there is an attributedResolver block that can be passed as a resolver for inner attributes and defaultAttributes property that’s acting as a fallback. Example of a call-site:
private let gameRules: AttributedTextView = {
let textView = AttributedTextView()
textView.translatesAutoresizingMaskIntoConstraints = false
textView.isEditable = false
textView.isScrollEnabled = false
textView.defaultAttributes = [.font: UIFont.systemFont(ofSize: 14.0, weight: .regular),
.foregroundColor: UIColor.gray]
textView.attributesResolver = { attributes in
if let importantAttribute = attributes.first(where: { $0.isImportant }), attributes.contains(where: { $0.isTappable }) {
switch importantAttribute {
case let .important(level) where level == .very:
return [.foregroundColor: UIColor.blue, .underlineStyle: NSUnderlineStyle.single.rawValue, .font: UIFont.systemFont(ofSize: 24.0, weight: .bold)]
default:
return [.foregroundColor: UIColor.blue, .underlineStyle: NSUnderlineStyle.single.rawValue, .font: UIFont.systemFont(ofSize: 14.0, weight: .medium)]
}
} else {
return attributes.reduce(into: [NSAttributedString.Key: Any]()) { result, attribute in
switch attribute {
case let .important(level) where level == .very:
result[.foregroundColor] = UIColor.blue
result[.font] = UIFont.systemFont(ofSize: 16.0, weight: .bold)
case let .important(level):
result[.foregroundColor] = UIColor.blue
result[.font] = UIFont.systemFont(ofSize: 14.0, weight: .medium)
case .tappable:
result[.underlineStyle] = NSUnderlineStyle.single.rawValue
result[.font] = UIFont.systemFont(ofSize: 14.0, weight: .medium)
}
}
}
}
return textView
}()
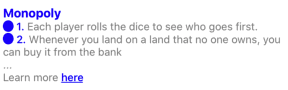
gameRules.set(attributedString: """
\("Monopoly", .important(.very))
\(ruleImage) \("1.", .important()) Each player rolls the dice to see who goes first.
\(ruleImage) \("2.", .important()) Whenever you land on a land that no one owns, you can buy it from the bank
...
Learn more \("here", .tappable(openWikipedia), .important(.enough))
""")
And the result:
Of course, you might say that it’s barely more readable for you than the version with explicit styling. However for me the styling makes me go out of the context of the stuff that I’m writing: on one hand I’m writing a text about rules of the game and then in the middle of that sentence I have to focus if the URL should have a blue color or not. Instead, I can just declare that the URL is important to me and figure out the styling later on.
What are your thoughts? Would love to hear it!